Native Xbox Mixer Streaming with Lightstream Studio

Direct Xbox Streaming: Setup A Lightstream Studio Overlay

Native Xbox Mixer Streaming with Lightstream Studio


OK so now comes the fun part! Laying out and design your own scenes for your Xbox One streams.

If you have yet to link and authorize your Mixer account to Lightstream Studio, make sure to follow this guide first before continuing on.

After everything is setup, it is up to you and your creative talents to put design an eye-catching stream layout. Or is it? If you don't have design in mind or if you don.t have the time to put one together, fear not- Lightstream Studio has plenty of free templates that you can start off with.

This guide will walk you through the process of setting up a pre-built overlay design. I really dig the Mixer themed overlay so lets use that in our example. Once you are comfortable with the process, feel free to experiment with any of the other layouts or you can even venture into create your own design content with the website upload feature.

While you do not need a computer when you are streaming, you will need access to a web browser to do all the setup work.


Head over to Lightstream Studio or click the 'Enter Lightstream Studio' button in your Mixer channel settings in a web browser. Login and authenticate if needed.


CREATING YOUR 'STARTING SOON' SCENE


You should be in your 'My Mixer Project' if not, click the top left menu icon - My Projects - 'My Mixer Project'. This is the project that contains your Mixer feed as an available layer so ensure you select this project. 

Lets choose our 'Starting Scene' from the scene selection area. Lets take advantage of the 'Starting Scene' and use this as an intro/'starting soon' page. I've discussed this in another article, but a Starting Soon page gives time for viewers to join the stream and there is a sense of anticipation as well.


Lightstream Mixer Interface


  1. Click the '+' Arrow in your Layers section
  2. Select 'Image'


Lightstream Mixer Add Layer


An Image menu will open up on the left side of the screen. There will be a lot of templates to choose from as well as an upload button for custom design. For this tutorial we will focus on the pre-built Mixer template. Scroll down the Images list and click 'More Overlays >' in the Mixer Overlay section.


Lightstream Mixer Starting Scene


Click the 'Mixer Overlays' folder then click 'Select'. Again, lots of pre-built options to explore when you are comfortable setting up your own overlays.


Lightstream Mixer More Overlays


There are multiple options of 'Starting Soon' graphics. If you scroll down you will see a folder containing many more. I like the first one shown so lets click on it and hit 'Select'.


Lightstream Mixer starting soon


The image will load into your project and will be displayed as a new layer. This layer should be above your Mixer Feed layer as you want. You will also want to mute your Mixer Feed layer so no game audio or sounds are playing during your intro screen. Click the mute icon in the bottom left Audio Mixer corner.


Lightstream Mmixer Live Soon Splash


CREATING YOUR MAIN OVERLAY SCENE

Lets add a new scene that will act as your main overlay scene that will be used for your gameplay. You will switch from your Starting Soon scene to this one, once ready.

Click the Add Scene button at the button. I went ahead and renamed my new scene to 'Main Scene'.

  1. Click the '+' Arrow in your Layers section
  2. Select 'Mixer Feed' to add your main Xbox display scene.


Lets add your overlay layer next.

  1. Click the '+' Arrow in your Layers section
  2. Select 'Images'.


Lightstream Mixer main overlay


An Image menu will open up on the left side of the screen. There will be a lot of templates to choose from as well as an upload button for custom design. Again, for this tutorial we will focus on the pre-built Mixer template. Scroll down the Images list and click 'More Overlays >' in the Mixer Overlay section.


Lightstream Mixer main overlay


Click the 'Mixer Overlays' folder then click 'Select'.


Lightstream Mixer main overlay


Again, there are multiple graphics options for you to experiment with. In this example lets select the first overlay layout then click 'Select'.


Lightstream Mixer main overlay


The image will load into your project and will be displayed as a new layer. This layer should be above your Mixer Feed layer.


Lightstream Mixer main overlay


I love the clean, simple look of the layout! You can repeat the steps to create additional Scenes for 'Be Right Back' and 'Ending' Screens. Go through the pre-built graphics again, and you will see multiple options to choose from.

All your progress should be auto-saving as you work so no need to manually save. Once you are happy with your scenes, you are ready to start streaming off your Xbox with your new overlays!

If you would like to take this a step further and add alerts and an alert history event list, head over to this tutorial to add the respective Streamlabs Alert Box and Event List widgets. Just add these are additional layers to this scene.

Lightstream Mixer BRB Lightstream Mixer Thanks For Watching


Your overlays and alerts will always be active once you toggle the 'Send my Mixer video feed to Lightstream Studio' in your Mixer settings via a web browser. If you would ever want to disable Lightstream, just head back to your Mixer channel in a web browser and toggle the button off in your settings. Toggle it back on whenever you are ready to use them once again. Nice and easy!


Lightstream Mixer toggle


Native Xbox Mixer Streaming with Lightstream Studio

Stream From Xbox One With Overlays And Alerts Via Lightstream Studio

Native Xbox Mixer Streaming with Lightstream Studio


Xbox One streamers, the moment you've been waiting for is finally here! Native Xbox One streaming with overlays and alerts without the need for a PC connection (no capture card or Xbox app needed). That right, you can now live stream directly from your Xbox One S or X and can customize your stream display with graphics and alerts!

This game-changing technology is all made possible via Lightstream Studio's direct Mixer integration. This web based software will allow you to customize your streams with scenes, overlays and alerts for a more professional looking stream. You will need to access the website via a web browser to configure and modify your scenes, but is not necessary when you go live.

As of this writing, this feature is currently available to Mixer Partners and Mixer Pro members, but will be open to all Mixer streamers in the future.


To get started you will need to authorize Lightstream Studio to be used with your Mixer channel.

Head to your Mixer channel in a web browser and make sure you are logged in with your streaming account.

  1. Click your icon in the top right
  2. Click 'Manage Channel'.


Mixer manage channel


Under the Broadcast tab, in the 'Lightstream [Beta]' section, click the 'Authorize Lightstream Studio' button.


Mixer Lightstream authorize


'Approve' the necessary permissions to continue logging in.


Mixer Lightstream permissions


The Lightstream Studio page should open up, but if not, head over to https://mixer.golightstream.com in a web browser to begin customizing a project. You should be greeted with a welcome screen. Click the 'Get Started!' button.


Mixer Lightstream splash


TIP: You may receive a warning to disable your ad blockers for the website to function properly. Make sure to do this to ensure everything is setup and working properly.


You will then see a sample project with a Starting Scene. This is the project you will want to modify as it includes your Mixer feed already. Here is a quick breakdown of the Lightstream Studio UI:

  1. Main menu which give you your settings, project selection, FAQ and a log out option.
  2. Your Layers section, which work similar to Photoshop layers. The layers above will have visual priority and will be displayed on top of the subsequent layers. The automatically created 'Mixer Feed' layer is your Xbox stream. This is your live feed and should be your lowest layer as you want your alerts and overlays above.
  3. Audio Mixer section - Lets you control the audio level of various layer elements.
  4. Scenes Section - Here you can create different scenes and switch them out in certain situations. You can swap scenes via web browser or mobile app.
  5. Display Output Window - This is your display layout that you create. What you see if what you get on your stream.


Mixer Lightstream UI


Again, this is your default Mixer project that will be output to your stream so lets go ahead and customize our Mixer project. Feel free to work with this as your main scene.


In a web browser, head back to you Mixer page - Manage Channel - Broadcast Settings.

Click the 'Send my Mixer video feed to Lightstream Studio' toggle. This needs to be enabled before you go live on via your Xbox. This only needs to be toggled on once as long as you are happy with the Lightstream integration. To disable Lightstream Studio, just come back to this settings page and click off the toggle. If you want to make edits to your Lightstream scenes you can click the 'Enter Lightstream Studio' button as well.


Mixer Lightstream send feed


Congrats! Streaming directly from your Xbox with now interface with Lightstream Studio and display your created overlays on stream. There should not be any noticeable delay in your stream and you should still be able to interact with your viewers in real time with FTL (low latency) technology.


SETTING UP YOUR ALERTS VIA STREAMLABS

Lets head back to Lightstream Studio and start populating your default scene. Lets add the two most basic overlay elements:

  • Alert Box:  Real-time follower, subscriber, donation and host alerts. You can choose to include sounds and animated graphics, custom colors, fonts, etc.
  • Event List:  A history of your recent alerts. This can also be customized with animated transitions, fonts, backgrounds, colors, etc.


  1. Click the '+' Arrow in your Layers section
  2. Select '3rd Party Integrations'


Mixer Lightstream Studio add source


You will see all the available third party integration options. In our example, we will use Streamlabs. Click on the Streamlabs logo.


Mixer Lightstream Studio 3rd party


You will have two new items on screen. The first being a box for you to enter your Streamlabs alert widget URL.

The next  item will be the actual output window that will be displayed on stream. Feel free to click on this box to adjust and relocate this on screen.


Mixer Lightstream Studio Streamlabs


We now need to head over to Streamlabs to setup and some widget.

Check out this tutorial to setup a simple Alert Box in Streamlabs. Once you've set this up and generated your unique URL, copy it and head back to this section. Ignore the OBS setup section as that is for PC streaming only.

Paste the Streamlabs Alert Box URL in the box back in Lightstream Studio. I also went ahead and renamed this layer 'SL - Alert Box' for better scene management.

You should then get a pop up letting you know that the link was entered properly and accepted.


Mixer Lightstream add Streamlabs source


TESTING OUT THE ALERT BOX


With both Lightstream Studio and Streamlabs browser pages open, click 'Test Follow' in Streamlabs-Widget-Alert Box. If setup properly, the alert should appear in Lightstream Studio. Go ahead and test out the subscribe, donation and host as well.


Mixer Lightstream Studio Alert Box test


ADDING STREAMLABS EVENT LIST OVERLAY


Now lets add an Event List that tracks some of your recent alerts you previously set up.

  1. Again, lets click the '+' Arrow in your Layers section
  2. Select '3rd Party Integrations'


Mixer Lightstream Studio add source


You will see all the available third party integration options. In our example, we will again use Streamlabs. Click on the Streamlabs logo.


Mixer Lightstream Studio 3rd party


Check out this tutorial to create an Event List in Streamlabs. Once you've set this up and generated your unique URL, copy it and head back to this section. Once you've set this up and generated your unique URL, copy it and head back to this section. Ignore the OBS setup section as that is for PC streaming only.


Paste the Streamlabs Event List URL in the box back in Lightstream Studio. I also went ahead and renamed this layer 'SL - Event List'. Keep things organized!

You should then get a pop up letting you know that the link was entered properly and accepted. I've adjust the Event List box window to be in the top right corner of my stream display. You can manually click and drag the handles to adjust the size or click inside to move it. You can also manually enter values in the Size and Position prompts below the window.


Mixer Lightstream Studio Event List


Similar to the Alert Box, lets test this new widget out. With both Lightstream Studio and Streamlabs browser pages open, click 'Test Follow' in Streamlabs-Widget-Event List. If setup properly, the alert should appear in Lightstream Studio. Go ahead and test out the other alerts if you would like. feel free to customize the look of your Event List within the Streamlabs website.


Mixer Lightstream Studio Event Enlarged


As long as you have Lightstream Studio toggled ON in Mixer via a web browser, these scenes will load and be active every time you stream directly from your Xbox One. Enjoy!

Tweak your other settings (camera, quality, mic, controller sharing) via Xbox One as normal.


Streamlabs Event List

Adding Streamlabs Event List Overlay To Your Stream

Streamlabs Event List


Now that you have Streamlabs setup with your broadcasting software lets go ahead and get another basic stream overlay tools setup. Streamlabs has multiple URLs for the different overlay tools, adding the Event List will be very similar to how you added the Alert Box, just with a different BrowserSource URL. The Event List overlay gives you a visual timeline of recent follows, subscribers, donations and hosts. I believe this is another staple alert that can add a lot to your stream.


Streamlabs event list


Ensure that you have already linked Streamlabs with your broadcast software.

Head over to the Streamlabs homepage and click the 'Login to get started button'. You should already have your permissions setup, from your initial Streamlabs setup, but if not go ahead an accept all the permissions to continue logging in.


Streamlabs login


Once at your Dashboard screen, click the Widgets section to open this up.


Streamlabs dashboard


Your available Widgets will now be listed. As of the writing of this article you should have the following options. Click the 'Event List'.


Streamlabs Event List Widget


Here is the top section of the Event List settings.  Click the 'Copy' button in the Widget URL section. This is your unique URL that will be pasted into OBS. As the warning below states, do not share this with any other users or sites.

Once copied, lets open up your broadcasting software. In this example, we will be using OBS.


Streamlabs Event List URL


Head over to OBS

  1. Select your Scene that you want to display the graphics. Or create one if you have yet to set this up. In my example, I am picking my sample - Xbox scene.
  2. Under the 'Sources' column, click the '+' sign to add a new source.
  3. Select 'Browser Source' from the list.


OBS streamlabs browsersource


  1. Give this source a name. In this example we will name it 'Streamlabs Event List'.
  2. Click 'OK'


OBS Streamlabs Event List Source


In the properties window:

  1. Paste the Streamlabs Widget URL that you copied from the Streamlabs website in the previous steps. You can also adjust the width and height of the display as needed. You can also adjust this in real time later.
  2. You can adjust the default Width and Height per your personal preference. I start with 400 x 300 for the Event List. This can also be manually adjusted in your OBS display window.
  3. Click 'OK'.

OBS streamlabs browsersource settings


You will now have a red outline on screen which represents your newly created Streamlabs Event List overlay. Click and drag one of the red circle handles to adjust the size and proportions. Click and drag inside the box to move its location, if desired. It is a good idea to now lock the window so you do not accidentally move the source. Click the lock icon next to your source name. Simply unlock this anytime you want to make any later adjustments.

OBS Locked source


Now it is time to test out the alerts to make sure everything is functioning correctly. No need to go live, just keep OBS open for now.


Head back to the Streamlabs website. In the Widgets - Event List settings, you will have the option to test the four alerts.


Streamlabs Event List Test


Give each one a try and you should see the alerts in OBS.


Streamlabs OBS Event List


All good to go!


Customizing Event List graphics, text, etc.

The default Event List settings, fonts and graphics will work, but I would suggest going through your Event List settings and customizing each alert.

The default settings do not create event for follow and hosts. Personally I like including these as well. Make sure to check these boxes if you want these included in your event list. When you are happy with your changes, do not forget to hit the Save button.

Remember to keep branding in mind. This would be a good opportunity to standardize your fonts and color schemes. You want to stand out from the rest!


Streamlabs Event List Settings


Streamlabs to OBS

Adding Streamlabs As An Overlay In OBS & Creating Alerts

Streamlabs to OBS


Setting up Streamlabs is fairly straight forward. Streamlabs has multiple URLs for the different overlay tools, but the process is similar to add each one. This guide will cover the Alert Box overlay, which gives you audio and visual alerts for follows, subscribers, donations and hosts. Frankly, I believe this is a staple alert that needs to be added to your stream. From a viewer's perspective, its exciting to see your name pop up on stream. It would then be your job, as the streamer, to address the alert and give the viewer their recognition.

Head over to the Streamlabs homepage and click the 'Login to get started button'


Streamlabs login


Streamlabs gives you the option to login via multiple accounts. This tutorial is for Mixer so we will click the Mixer logo to login. Enter your credentials for your streamer account.


Streamlabs login


Grant any authorizations that may pop up. This will give Streamlabs all the required permissions it needs to function properly.


Streamlabs authorization


You will most likely be taken to the main Dashboard screen. This handy screen lets you see some of your up to date stats. Since we will be setting up the OBS overlays, lets click on Widgets section to open this up.


Streamlabs dashboard


Your available Widgets will now be listed. As of the writing of this article you should have the following options. Lets start with the basic alerts. Click the  'Alert Box'. This option lets you set alerts for follows, subscriptions, donations and hosts.


Streamlabs widgets


Here is the top section of the Alert Box settings. Here you can enable whichever alerts you want active. I use Streamlabs alerts for all four. Next, click the 'Copy' button in the Widget URL section. This is your unique URL that will be pasted into OBS. As the warning below states, do not share this with any other users or sites.

Once copied, lets open up your broadcasting software. In this example, we will be using OBS.


Streamlabs alert box settings


Head over to OBS

  1. Select your Scene that you want to display the graphics. Or create one if you have yet to set this up. In my example, I am picking my sample - Xbox scene.
  2. Under the 'Sources' column, click the '+' sign to add a new source.
  3. Select 'Browser Source' from the list.


OBS streamlabs browsersource


  1. Give this source a name. In this example we will name it 'Streamlabs Alert Box'.
  2. Click 'OK'


OBS streamlabs browsersource name


In the properties window:

  1. Paste the Streamlabs Widget URL that you copied from the Streamlabs website in the previous steps. You can also adjust the width and height of the display as needed. You can also adjust this in real time later.
  2. Click 'OK'.


OBS streamlabs browsersource settings


You will now have a red outline on screen which represents your newly created Streamlabs alert box overlay. Click and drag one of the red circle handles to adjust the size and proportions. Click and drag inside the box to move its location. It is a good idea to now lock the window so you do not accidentally move the source. Click the lock icon next to your source name. Simply unlock this anytime you want to make any later adjustments.


OBS streamlabs browsersource window

Now it is time to test out the alerts to make sure everything is functioning correctly. No need to go live, just keep OBS open for now.


Head back to the Streamlabs website. In the Widgets - Alert Box settings, you will have the option to test the four alerts.


Streamlabs test alerts


Give each one a try and you should see and hear the default alerts in OBS. 


Streamlabs follower alert

Streamlabs subscriber alert


Streamlabs donation alert

Streamlabs host alert


All good to go!


Customizing alert graphics, sounds, text, etc.

streamlabs zombie gif

The default zombie GIF is cool and all, but I would suggest going through your alert box settings and customizing each alert. There is a library of stock GIFs and sounds so you can start there. Or you can also upload your own. I would Also look to creating a brand for yourself and your channel and one good way to start is by standardizing your fonts and color schemes. This will help establish yourself more as a professional streamer vs. someone who is happy with all the default status quo settings.


Firebot Fx Title

Customizing Firebot Buttons: Adding Effects


Firebot Fx Title


If you've followed all the other Firebot guides up until this point, you should be ready to go with adding effects to your buttons. If you have yet to finish those steps, make sure to check the guides out prior to adding effects.

Hover your mouse over Button 1 and an 'Edit' option will appear in the upper right corner. Click this button.


Firebot interactive button


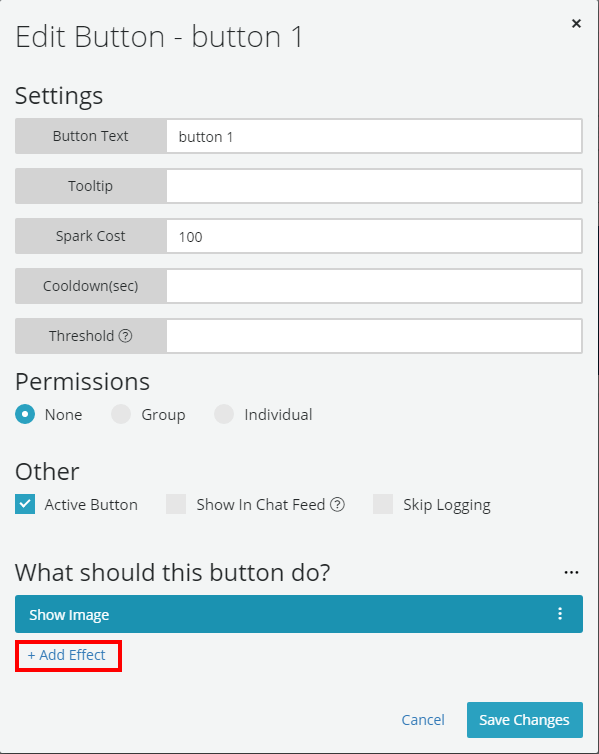
An Edit Button window will open up. Here is a run down of the settings:


Button Text: This is what is displayed on your Mixer interactive board. Just keep in mind that this will be overwritten by the button name in Mixer Developer Lab next time you save and sync. So if you want to change a button  name, I would recommend doing it directly in Mixer Developer Lab.

Tooltip: When a user hovers their mouse over the button, a text box will pop up displaying whatever text you enter here.

Sparks Cost: The cost, in Sparks, a user 'pays' to use the button. This will temporarily overwrite the sparks cost set in Mixer Developer Lab. This will also be overwritten by the by Mixer Developer Lab values next time you save and sync. If you want to permanently change the sparks cost, I would recommend doing it directly in Mixer Developer Lab.

Cooldown(secs): The buffer time required before this button can be used again. A countdown will be displayed on the button until the button is activated again.

Threshold: A unique option that I incorporate into my stream. This number will be the amount of times the button must be pressed before it is activated. This threshold will be shared across all users. 


Permission:

None: The default option. Every user will have the ability to activate this button.

Group: Allows you to select which Firebot group can activate this button.

Individual: Allows you to enter individual users who can activate this button.


Other:

Active Button: If unchecked, this will disable the button.

Show Chat in Feed: If checked, the activity will be displayed in the chat feed.

Skip Logging: If checked, this activity will not be logged in the moderation panel.


What should this button do?: This is where you add an effect to the button. 

Click the '+Add Effect' button to start customizing a specific effect.


Firebot button options


A window will open up. Click the first text box and it will open up a list of the available effects. Here is an image of all the effects as of version 4.10.5. Lots to choose from! In this tutorial we will focus on a simple GIF file. So select the 'Show Image' option.


firebot effects


A new window will open up. Click 'Choose File' and browse to your file location. Alternately, you can choose an online image by clicking the URL option then pasting in your image link.


firebot image edit effect


In my example, I created a folder within My Documents to keep all my Firebot media. Select a file and click 'Open'. We will be using a Game Over GIF for our example. If you have yet to build a GIF library then some quick Google images searches might be a good start or perhaps give Giphy a try.


Firebot file selection


Your GIF will now be associated with the button effect. Here is a quick run down of the available settings:

Overlay Display Location: This section will allow you to adjust your image location on screen by selecting preset quadrants, specific coordinates or even random preset locations. I will just leave it on the default center screen preset for this example.

Enter/Exit Animations: This section gives you a lot of choices to jazz up your image/GIF. The default fade in/out is decent, but feel free to experiment with other animation options.

Dimensions: If you leave this blank, your image will be displayed at its full resolution. You can reduce the size on screen by entering in custom dimensions.

Duration: Adjust the timing of how long your image displays on screen. This is a nice option that will allow you to shorten the display time of a long GIF.

The disclaimer at the bottom of the window is a reminder to link Firebot to your broadcast software. If you have still yet to do this, make sure to first link Firebot to OBS otherwise your images will not display on stream.

Click 'Add' when you are all happy with your settings. Don't worry, you can always come back later to make adjustments.


Firebot image edit effect


Under the 'What should this button do?' section you will now see the 'Show Image' effect that you created. You can always click on the effect if you ever need to edit it. You can also click the three vertical dots to the right if you ever want to duplicate, copy or delete this effect.

Click 'Save Changes' and the effect can now be triggered to display in your broadcast software, but lets go ahead and add the accompanying sound effect. Click the '+Add Effect' button again. 


Firebot image edit effect


This time in the Add New Effect window lets select 'Play Sound'


Firebot effects


A new sound effect selection window will open up. Click 'Choose' and lets browse for our file.


Firebot sound effect


In my example, lets browse back to the folder I created within My Documents where I keep all my Firebot media. Select the file and click 'Open'. We will be using a Game Over mp3 file for our example but Firebot will accept many audio file formats. You can build a sound fx library with some quick Google searches. Be creative!


Firebot file selection


Your mp3 file will be associated with the button effect. You can also adjust the volume of the sound clip along with the output device if need be.

Click 'Add' to finish up the sound effect.


Firebot sound effect


Your button will now be loaded up with both your image and sound effects and should be ready to test out. For good measure I added a 30 second cooldown to prevent spamming of the button. This tutorial just covers the basics of a simple GIF and sound fx combo. There are lots more you can experiment with. I plan on writing some additional guides for more Firebot effects so keep an eye out for those. 

Another nice effect worth mentioning is 'Cooldown - cooldown some buttons'. This effect comes in handy when you have multiple buttons and you want multiple buttons to go on cooldown together. Again, this is a great way to avoid spamming of buttons.


Firebot sound effect


The button is ready to go. Lets open up your broadcasting software, OBS in our case, and lets test it out! Just ensure your Firebot overlay is turned on and simply press the button via the Firebot interface. No need to go live and start streaming. You can also test the button directly on your Mixer channel, again without going live. If you want to test it this way, make sure your streamer and bot accounts are still logged in. Click the toggle connection button at the bottom left of the Firebot main screen. The four smaller icons in the bottom left should connect and turn green. You may get errors every now and then. Just try clicking the connection button again if this happens.


Firebot interface


As Firebot is connecting you will see a 'Connecting to Interactive...' message in your Mixer channel below your stream/offline window.


Connecting to Interactive


If all goes well, your interactive board will connect and turn on in your Mixer channel.


Pro Tip: Make sure your streaming account and your bot accounts are exempt from Sparks costs otherwise your Sparks will be debited every time you click the buttons. No need to lose your hard earned Sparks in your own channel! Go into Firebot - Moderation. Then under 'Spark Exemption' enter your streamer account name and click 'Exempt'. I would then do the same for your bot account name in case you are ever logged in as the bot and testing buttons.


Try pressing 'button 1' and it should activate within OBS. If you set a cooldown, a timer should also go off. Using these guides you can now go back and create additional button and effects. Have fun!


Mixer Interactives


FIREBOT

Firebot is a fantastic bot that has a robust set of features and it is constantly being updated. It is also developed and maintained by one of Mixers own partners! I'm now using Firebot and Mixer's Dev Lab interactive board for all my sounds and graphics. I also have a few custom commands setup via Firebot. I still use Scorpbot to handle my channel currency, hours, giveaways, chat games, most of my commands. I lfeel like some of the advantages Firebot has over Scorpbot are:

  • A more user friendly interface
  • Custom user grouping features
  • Direct connectivity with Mixer's built in Dev Lab.
  • lots and lots of transitions for your graphics

Firebot does require some additional steps to get linked up with your Mixer page, so make sure to start with that guide!


Firebot Mixer

Linking Firebot With Your Mixer Channel

Lets get Firebot all linked up with Mixer and allow all the required privileges to allow proper functionality.  The first ...

Firebot to OBS

Adding Firebot As An Overlay in OBS

In order for your Firebot images or video files to show up on your live stream, you need to link ...

Firebot Mixer buttons Title

Creating Interactive Buttons For Firebot

Let the fun begin! Now that the hard part is over and you've linked your Firebot and Mixer accounts, you've ...

Firebot Fx Title

Customizing Firebot Buttons: Adding Effects

If you've followed all the other Firebot guides up until this point, you should be ready to go with adding ...


Firebot Mixer buttons Title

Creating Interactive Buttons For Firebot


Firebot Mixer buttons Title


Let the fun begin! Now that the hard part is over and you've linked your Firebot and Mixer accounts, you've got the freedom to use your creativity and create some interactive buttons that your viewers can have fun with. If you have not done this step yet, make sure to check out this guide to get you setup.


Head back to your Mixer Developer Lab home page. Again, make sure you are always logged in as your streaming account and not your bot.

  1. Click your avatar to the top right to open up your side menu.
  2. Click on 'Dev Lab' at the bottom of the side menu.


Your newly created project from this guide should now be listed. In our example, we named it 'test sound board'. I've got a few more boards listed as this is my live streaming account. 

Click the 'Editor' button

mixer dev lab selection


Click the 'Build' tab.


mixer dev lab build


Welcome to your interactive board build screen. This is where you will create and layout button with basic properties.

  • The 'Scenes' give you the flexability to have different layouts within the same board. I use this by creating mod and subscriber boards.
  • The 'Controls' section is where you populate your buttons.
  • The 'Grid' section is the actual layout that you will see on your Mixer channel when your board is enabled.
  • The save button to the right is also important. Make sure to save often.


Lets create a button by clicking the '+' sign in the controls column.


mixer dev lab buttons

Some additional items will open up. 

  1. Enter your button name here. In this example, this will be called 'button 1'. This is not the name that appears on your soundboard though. You get to set that name in the next step.
  2. There are multiple options in what button type you can make. This tutorial will cover a simple 'button' so click that option.
  3. Click the 'Add' button.


Mxer dev lab buttons


Your new button will appear in the control column. Click the arrow button to the right side to finish editing the properties.


mixer dev lab buttons


  1. Fill in the display name of your button in the 'Text*' box. This is the actual name that shows up on your sound board. I will just keep things simple and use the same name and the button name, 'button 1'.
  2. Fill in your sparks cost. Keep in mind that this can be overwritten in Firebot, but every time your resync your to Dev Lab, it will reset to the sparks cost set here so its best to get that number to your liking now. Or change it here rather than in Firebot.

There are a few more items here that you can customize and I will go over these in a future post, but we will stick to the basics for now.

Click the 'X'  in the button to finish up.

mixer dev lab buttons


After you X out. You are all set. Congrats on creating your first Mixer Developer Lab button!

Repeat these steps to create additional buttons.

mixer dev lab buttons


The next step is placing your buttons on your Grid layout. This layout represents the layout on your Mixer page. I went ahead and created two additional button for this example. Simply click and drag the button onto the Grid. You can then rearrange and click and drag the sides to adjust size. Click 'Save' When you are happy with your layout.

To the right side you will also notice three icons which represent phone (small grid), tablet (medium grid) and desktop (large grid). This will allow you to create separate arrangements for each specific device. I would recommend coming back and creating layouts for each to ensure all your viewers will have a good experience using your interactives, regardless of what device they are using.


Mixer Dev Lab buttons

adding interactive buttons to your Mixer page layout


  1. Head back to Firebot and click 'Change Board'
  2. Click 'Resync Board'.

Alternately, Firebot resync's when you open the program up. So opening it up for the first time will also work to resync.

Firebot resync


This should load up the Mixer Developer Lab changes and you will now see your three new buttons (or however many you created). Don't forget that the layout and quantity of buttons will be handled via your Mixer Developer Lab. Save the changes there then resync in Firebot. This will need to be done every time you make a change.

Firebot buttons


Buttons can now be individually edited within Firebot to trigger sounds, images, videos, commands, etc. Make sure that you've already linked Firebot with OBS as a browser source. This step only needs to be completed once.


Firebot to OBS

Adding Firebot As An Overlay in OBS

Firebot to OBS


In order for your Firebot images or video files to show up on your live stream, you need to link Firebot to OBS as a Browser Source. This the final step in my guide to get your Firebot overlays up and running. Make to check out the other guides to ensure you have all the other steps complete:

  1. Link Firebot to Mixer Developer Lab
  2. Create Buttons in Mixer Developer Lab and connect to Firebot
  3. Connect Firebot to OBS so it displays as an overlay in your stream.


  1. Open up Firebot and go to 'Settings'
  2. Click the 'Overlay' tab
  3. Click the 'Get Overlay Path' button.

firebot overlay settings


A window will pop up with your link to connect Firebot to OBS. Click the 'Copy' button and click 'Okay' to close this window.

Make note of the warning box at the bottom of the window. A lot of streamers run into this issue when OBS is opened before Firebot when going live. Try and get in the habit of opening Firebot first so the source is refreshed and ready to go in OBS. Otherwise you will have to manually refresh in OBS to get your graphics to appear.

firebot overlay info


Head over to OBS

  1. Select your Scene that you want to display the graphics. Or create one if you have yet to set this up. In my example, I am picking my sample - Xbox scene.
  2. Under the 'Sources' column, click the '+' sign to add a new source.
  3. Select 'BrowserSource' from the list.


Add Firebot source to OBS


  1. Give this source a name. In this example we will name it 'Firebot'.
  2. Click 'OK'


obs firebot browsersource


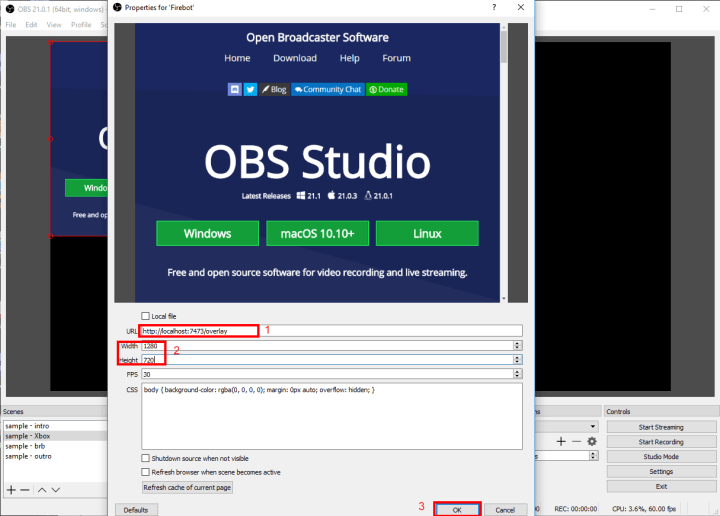
In the properties window:

  1. Paste the Firebot Overlay File Path that you copied from Firebot.
  2. Fill in your streaming resolution Width and Height as this overlay will encompass the entire screen. In our case I will use 1280x720 since I am streaming at 720P resolution.
  3. Click 'OK'.


obs firebot browsersource


You will now have a red outline on screen which represents your newly created Firebot overlay. If the red box does not fill the entire screen, click one of the red corners and drag to fill the entire screen. It is a good idea to now lock the window so you do not accidentally move the source. Click the lock icon next to your source name.


OBS firebot browsersource


You are all set! Firebot is now linked to OBS and your graphics are ready to be triggered and displayed in OBS and on your stream. You can now customize your Firebot buttons.


Scorpbot Alerts Title

Scorpbot Alerts And Activity History Overlays

Scorpbot Alerts Title


After you've got your web cam, mic, capture card settings down in OBS, you will be up and running with vanilla OBS streaming. This is an important first step because it will allow you to run some tests to ensure you have the best quality steam that you can mix together.

Take the time to tweak and perfect your basic setup and take advantage of the record button to monitor what your stream output will be, every time. I do a couple quick video recordings before I hit that stream button. Having a good audio mix and synced game and cam video/sound is critical to keeping an audience around.
Once you are good with your vanilla OBS, I would jump to Streamlabs to get your alerts overlay setup. I really like the flavor these alerts add to a stream therefore this was my first customization I worked on before and soundboard sounds or graphics.

You can also use built in alerts in Scorpbot. Set these up by following these steps:


SCORPBOT SFX VIA ALERTS

Now that you have a SFX in Scorpbot, you can take this a step further via the built in functionality and apply this to an Alert.

  1. Head over to the 'Settings' tab.
  2. The SFX column can now be populated with your newly created sound via the drop down menu. If you create additional SFX,they will show up here as well. The same can be down with graphics. Make sure to head over to that tutorial page to get them setup first.

Scorpbot Alerts Title

Adding An Interactive Board [Scorpbot]

Scorpbot Alerts Title


SCORPBOT SFX VIA INTERACTIVE BOARD An interactive board can be a way to keep viewers occupied and give them more opportunities to interact with you as you stream. Sparks cost and cooldowns can be adjusted for each button so you can customize things to your liking. This will also help minimize the spamming of your interactive buttons. Here is a step by step to get the board up and running on Scorpbot. Make sure you've already setup some sounds and / or graphics and also added Scorpbot as a source in OBS.  

  1. Head over to the 'Interactive' tab.
  2. Input the name that you would like displayed on the button.
  3. Enter your desired cooldown time in seconds before the button can be pressed again.
  4. Enter your desired sparks cost per button press.
  5. This is your syntax to activate the command. It must be typed correct in order to work: $sfx(filename). In our example the 'Game Over' file name is entered minus the file extension, which is not needed. Change this accordingly to whatever your filename is.
  6. Ensure that the two checkboxes are ticked.
  7. I recommend clicking the 'Free for Caster' checkbox. This ensures that no sparks are deducted from your total when you press the button. This helps for testing purposes, but is also nice to keep on all the time.
  8. Once all this is set, click the 'Create' button.
  9. A new button will appear based on the size in the options. To modify the size or move the button around, uncheck 'Visible' and click 'Update. Just make sure to make it visible again and update when you are happy with the size and location.

    Rinse and repeat to add additional buttons. If you would like to create a button that displays graphics, head over to the GFX tutorials( under construction). To enable to buttons on stream, click the Connect button. To disable just click the Disconnect button. Make sure you've linked your bot and streamer accounts first otherwise this will not work.