Scorpbot Alerts Title

Adding Scorpbot Sound FX To Your Live Stream

Scorpbot Alerts Title


SCORPBOT SFX VIA COMMAND Scorpbot allows you to add custom sound effects (SFX) and graphics (GFX) to your OBS scenes. These can be triggered via custom commands, actions (follows, hosts, etc.), or they can be incorporated via the built in interactive board.

  1. Open Scorpbot and click the 'Audio' tab
  2. Click the 'SFX' sub tab
  3. Click the 'Open Folder'

scorpbot sound effects


  1. A Windows Explorer window will pop up. My default path is set to: C:\ScorpBot\SFX. This is where you will drop your audio file via Windows Explorer.
  2. In this example I am using a 'Game Over.mp3' sound clip.


scorpbot windows file location  


  1. Head back to the same 'SFX' Scorpbot tab and 'Reload'. The clip should now appear on your page.
  2. Set the 'User Delay'. This will be the cooldown before the command can be used again. This is very important to do this to prevent spamming the command.
  3. Adjust your 'Default cost'. This will apply all around to all your SFX commands unless you specify a 'Cost' further below.
  4. Give the command a name. I would include the '!' as the command will have to be typed verbatim.
  5. Click 'Save' to save the information to Scorpbot. Rinse and repeat to add additional SFX.

Don't forget to make sure you have the boxes checked to enable the SFX commands. In my example, the command to type in chat is '!over' and it will trigger the sound 'Game Over.mp3. It has a user delay of 5 minutes and will cost each user 25 sparks each time.

scorpbot sound effects settings


Scorpbot to OBS

Adding Scorpbot As An Overlay In OBS

Scorpbot to OBS


In order for your Scorpbot graphics to display in OBS and finally output to your stream, you need to add Scorpbot as a source within OBS. It only take a few steps to get this setup and you should only have to do this once.

  1. In Scorpbot, head over to the 'GFX' tab
  2. Match your window size to your streaming resolution. In my case, this is 720p.
  3. Its a good idea to click the 'Show window on startup' check box so you graphics are always ready to go.
  4. Click the 'Open Stream Window' button and a new window will open up.


  This is your virtual green screen that you just setup. This is your pallet that you will use to place and locate your graphics on your screen. Keep in mind that this must always be open and not minimized in order to work. oooh green screen  


  For this next step we are basically linking this Scorpbot  green screen window in OBS. We will then key out the green background similar to how a green screen works to remove the background in your webcam. Once this window is linked, every time a Scorpbot graphic is triggered, it will then display in OBS which then outputs to your stream. Good to go!  Leave Scorpbot and the green screen window and not minimized. Open OBS.

  1. Select your Scene that you want to display the graphics. Or create one if you have yet to set this up. In my example, I am picking my sample - Xbox scene.
  2. Under the 'Sources' column, click the '+' sign to add a new source.
  3. Select 'Window Capture' from the list.


  1. Give this source a name. In this example we will name it 'Scorpbot Interactives'.
  2. Click 'OK'


  1. A new properties window will now pop up and there will be a pull down window that lists all your current Windows windows. As long as you didnt minimize the Scorpbot windows, you will see '[Scorpbot.exe]: Scorpbot - Stream Window' as an option. Select this window.
  2. Uncheck 'CaptureCursor'
  3. Click 'OK'
  4. The green screen window will now appear in your scene. It should be set to your window size, but if not, you can adjust it by clicking and grabbing the handles. You may need to shift+click and drag to fine tune the sizing.


  1. Next we will make the green color disappear, leaving us with a transparent background to work with. Right click your new source and go to 'Filters'.


  1. Click the '+' sign in the new 'Filters' window.
  2. Select 'Chrome Key' from the list and give it a name. I am leaving it as the default in this example.
  3. You'll notice the default settings for this Chroma Key will wipe out the green screen background!
  4. Click 'Close' and you should be all set up with linking Scorpbot to OBS.


  1. One last step I recommend is locking the source to prevent any accidental movement. This is setup to fill your entire screen so there is no need to move it. You will be adjusting the graphics placement directly in Scorpbot.


This step only needs to be completed one time as long as you leave it as a source in OBS. Once this is finished, check out these other Scorpbot guides.

MIXER COMMANDS


Here is a current list of active user commands on my Mixer channel. Just type these into chat. Items within [brackets] require additional text input. Most of these are Scorpbot commands. There are a few within Firebot and I will be experimenting with Streamlabs Chatbot soon as well.

Command Description
!cheers orange mocha frappuccinos!
!christmas how many days until Christmas?
!commands shows you a current list of available commands
!currency summary on our potato, channel currency
!dadjokes yup we've got em
!discord get the Discord link and info
!fc Get my Nintendo Switch friend code. Add me!
!followage [username] how long have you been following the channel?
!games summary on available chat games
!gawk shows you Spam's Gawkbox link to tip for free!
!give shows you the proper command to share your potatoes with others
!gs [xbox gamertag] shows your current gamerscore
!gt see my xbox gamertag. Add me!
!host shows you how to host channel on Xbox
!hosts shows current number of people hosting the channel
!hours #1 viewer based on hours watched
!hours5 Top 5 viewers based on hours watched
!hours10 Top 10 viewers based on hours watched
!joined [username] shows how long user has been on Mixer
!justonemore Lets everyone know how many times Spam has attempted one more try
!leave lets Spam and mods know that you would like to be removed from the current game queue
!level shows your current Mixer level
!loots shows you Spam's loots link to tip for free!
!lurk Lets everyone know you will be in chat, but unavailable
!milk Yes. I need some milk.
!mixiversary shows the exact start date and time that you joined Mixer
!mod provide some info on becoming a mod
!nextgiveaway shows the required number of followers needed before the next giveaway
!nextrank shows your next potential rank and the hours needed to reach it
!potato see your current rank, hours and # of potatoes
!potatoes see your current rank, hours and # of potatoes
!roll this is how we roll...
!rules see the channel rules
!shoutout a quick note regarding shoutouts
!social see some of Spam's social media links
!sparks shows your current number of sparks
!steamkey summary on how to redeem a Steam key
!tater yup. Taters...
!tip shows you Spam's donation link. Thank you!
!tokens15 shows top 15 viewers with highest number of tokens
!top top viewer based on # of potatoes
!top5 Top 5 viewers based on # of potatoes
!top10 Top 10 viewers based on # of potatoes
!top15 Top 15 viewers based on # of potatoes
!top20 Top 20 viewers based on # of potatoes
!unlurk lets everyone know that you are back from your lurk and ready to hang
!uptime shows how long current stream has been live
!viewers shows current number of Mixer viewers
!wat wat crew represent!
!weather [location] shows current weather conditions at the stated location

OBS to Mixer

Configuring Your Live Streaming Software [OBS]

OBS to Mixer


There are a few options for streaming software out there. I currently use Open Broadcaster Software (OBS) so that is what we will be looking at in this tutorial. I also only stream on Mixer so my settings will be tailored for Mixer's zero latency FTL setup. Some of these initial steps will only need to be done one time, unless you purposely go back to fine tune some of these adjustments, which is recommended once you are comfortable with the options and are ready for trial and error. But in the meantime, lets get you setup and I'll show you some of my setup options.  


Step 1: Download and install the latest version of OBS


Step 2: Setup Stream Settings and Adjust Output Quality Again most of these settings will only need to be entered once as they are saved and used each time you broadcast. They will however always be available for adjustments down the road as you experiment what works best for your internet connection as well as your viewers. Open OBS, then the first thing you'll want to do is head to the stream settings which can be found under 'File -> Settings -> Stream' This tutorial will be based on Mixer's FTL (zero latency) technology so hopefully your internet connection is capable of handling this. Change the 'Service' to 'Mixer.com - FTL' via the pull down menu.  


The Stream Key is your unique identifier which connects your OBS software to your Mixer account. This unique key is important and should not be shared. To get your key, head over to Mixer.com, login with your streaming account. Click your avatar in the top right corner -> Manage Channel -> 'Broadcast' tab -> Then click the copy icon and paste it into the Stream Key box in OBS. Apply your settings.  


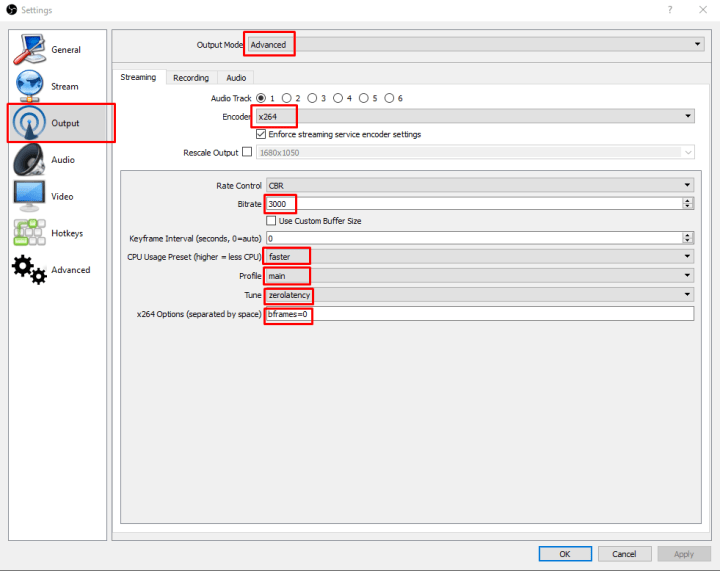
Step 3: Adjusting Output Quality Now that your Stream tab is setup, your OBS should be able to talk to Mixer and allow you to go live. This section will go into some of the finer details regarding your overall stream quality. There is a fine balance that you will need to find between your CPU availability, internet bandwidth and any limitations of the hosting site and your viewers connections. It would be best then to work with a baseline setting and adjust from there. The following screenshots will outline settings that I typically use given my hardware and internet bandwidth. This gives me a good stream quality while hitting the CPU and internet upload speeds a bit harder than average.   Head over to the Output tab in your OBS Settings. Switch the Output Mode to 'Advanced' to unlock some additional options. Encoder: x264 (software encoder), which would be your typical default encoder. Bitrate is most likely going to be the variable you will be adjusting as you tweak your stream output. Bitrate deals directly with your stream output quality and is dependent on your internet upload speed. I won't go into too much detail here as there is already plenty documented on the internet as far as 'best settings' goes. I would say to play within a range of 2500-3500. You should be able to get by with a lower bitrate setting on lower motion games vs. the higher bitrate requirements of faster moving games. So again play around with this, but for the purposes of this tutorial I will leave this at 3000 bitrate with a CBR Rate Control. The CPU Usage Preset is set to 'faster' which is one step slower than the default of 'veryfast'. For this setting, the faster this is set the less strain there is on your CPU resulting in a lower quality output.  Therefore the slower this is set, more strain on the CPU resulting in a higher quality output. The Profile is set to main based on Mixer recommendation. I believe this setting has a direct impact when viewing on mobile devices as certain devices may not be able to display high profile. The Tune setting is set to zerolatency based on Mixer recommendations. From what I understand the Tune setting has a sight effect on the time required to output video, in milliseconds. x264 Option: 'bframes=0' based on Mixer recommendation.


For Nvidia graphics card owners -  you will have to option to encode with NVENC H.264 Encoder: NVENC H.264 (hardware encoder which will minimize CPU usage) Bitrate is set to 3000 bitrate with a CBR Rate Control. Again you have to freedom to adjust this as you see fit The Preset is set to low-latency. Experiment with this setting and leave at Default if you have any issues. The Profile is set to main based on Mixer recommendation. I believe this setting has a direct impact when viewing on mobile devices as certain devices may not be able to display high profile.


Step 4: Creating Scenes Scenes are collections of elements that will be output to your channel. They are what your viewers will be seeing on stream as you activate them. I have multiple Scenes created for different game sources. I also have separate scenes for my Intro, BRB, Outro splash screens as well as my Raider Video. These are activated with a simple click of a button. Scenes can be dulplicated (by right clicking) then modified, if you want to create a similar scene. They can also be reordered to your liking.  


Step 5: Creating Sources Scenes are composed of a collections of sources. These sources are then main components in building a scene. Some example sources are your game inputs, webcam, mic, screen overlays, etc. This collection of sources really make up the entirety of your scene. You can click the eye icon to quickly disable or enable a source. Right clicking on sources bring up a menu with multiple options. Two important choices are 'properties' and 'filters' we will most likely go into more detail on some of these in the future.    


el gato 4K60_Pro

Beyond The Basics: Capture Cards And PC’S

el gato 4K60_Pro

Elgato 4k60 Pro / Elgato


So you are now streaming directly from your Xbox or PS4. It's great and all, but it seems quite..plain. Where are all the fun GIFs, sounds, and fancy overlays? In order to achieve this you will need to introduce a PC as your streaming source. This will give you the opportunity to add overlays, graphics and sounds to your hearts content.
 
The other required piece of hardware is a capture device that will accept video and audio signal from your console and display it on your PC for your stream output. Capture Cards can be internal, external, USB 2.0, USB 3.0. There is a handful of devices on the market, but some of the most widely used capture cards are from Elgato. This article won't delve into the differences, but perhaps a future post can cover this. Just expect to Shell out $100-$200. I personally use the older Elgato capture HD USB 2.0 external device in my setup and it still suits my needs and runs pretty flawlessly.
 
A quick comparison between the different models:
 
 Game Capture HD (old model):
 
  • UBS 2.0 (which introduces a slight delay on your computer monitor. You should have a second monitor/TV for your game play so this should not really be that big of an issue).
  • 'Master Copy' recording settings which will allow you to encode at different resolutions than your stream settings.
  • HDMI Input and component input for retro consoles
  • 1080p30 capture resolution


  • UBS 2.0 (which introduces a slight delay on your computer monitor. You should have a second monitor/TV for your game play so this should not really be that big of an issue).
  • 'Master Copy' recording settings which will allow you to encode at different resolutions than your stream settings.
  • HDMI Input
  • 1080p60 capture resolution

HD60S:

  • USB 3.0
  • 'Instant Gameview' which is close real-time viewing on your computer monitor.
  • Uses 'Stream Copy' recording settings which will replicate your exact stream settings when recording.
  • HDMI Input
  • 1080p60 capture resolution
 
 
  • PCIe internal card
  • 'Instant Gameview' which is close real-time viewing on your computer monitor.
  • 'Master Copy' recording settings which will allow you to encode at different resolutions than your stream settings.
  • HDMI Input
  • 1080p60 capture resolution
get started live streaming

What Do I Need To Get Started Streaming?

get started live streaming


Honestly to get up and running and officially streaming all you really need is an Xbox One or PlayStation 4 and an internet connection. These systems have integration with either Twitch (PS4) or Mixer (Xbox) at the push of a button, after a little initial setup of course.

No fancy camera, microphone or green screen required. These tools will of course only help your stream and potential viewership, but if all you currently have is one of the mentioned current gen consoles, then just roll with it. The best time to start is right now.

Another important thing to keep in mind is that building a viewer base will not happen overnight. The way I see it, the key is consistency in streaming. Of course life gets in the way of video gaming, but try and set a somewhat consistent schedule. Once you are live, just be yourself, relax and have fun! Interact with viewers the best you can. If you are limited to a chat pad...or worse..just the Xbox controller, then you may struggle a bit as you would have to take yourself away from the game play. If you plan to stream with a camera or microphone, then I would highly recommend picking up a chat pad controller accessory or using a USB keyboard.

The first step will take place on a PC or mobile browser. You will want to head over to Mixer.com and ensure that you link your Microsoft account. This will ensure that you are linked up on Mixer since there won't be any login information on your console. Make sure to take care of this step first to avoid any account problems in the future.

Once linked up on Mixer, head over to the Xbox Guide, by pressing the Xbox button. Scroll down to Broadcast second to last icon which looks like a satellite symbol. Select 'Broadcast your game'. Your game should be recognized, but feel free to include a title for your broadcast. I typically like to keep it short and sweet and perhaps try to add some humor to the title with some hashtags.

Ensure that the mixer link is correct. You can then scroll down to add mic, camera, chat and party chat options if you have these available. Again, these are all optional, but highly recommended. If you have a Kinect hooked up or storage away somewhere, don't forget that you can use the camera on it. If you are into multiplayer games, you probably already have a headset and microphone that you can use as well.

Co-streaming is also a native feature on Xbox for you and up to three other content creators. The will feature all the streamers on one channel. Its a great way to see various points of views and also see what the party is up to in real time. Sometimes just hearing the party in chat doesnt cut it.

Select start broadcast.

Streaming PC games is also quite simple with the right software, but this will be covered in a future post.


streaming tips

Streaming Tips

streaming tips


Don't have time to sit and ready through all the Streaming 101 info? Or did you read through it all and are looking for more info? Either way, here are some quick summary tips and highlights from this section. Best of luck in your streaming endeavor. If you have any further questions feel free to get in touch with me or our awesome community in the Discord server or leave a reply here.

  • Relax and have fun!

  • Do not worry about follower numbers when you are just starting out

  • Stream games that YOU want to play

  • Be consistent in your stream times

  • Practice interacting with your audience even if you have zero viewers in the room

  • Networking is key to build your community! Spend time actively viewing streams and interacting

    • Choose some like-minded streamers to hang out with

      • Join their Discord(s)! Yes. All of them! Continue to interact outside of the streams.

    • Get to know their followers and friends of their stream

    • Follow along on raids and expand your network

  • While you are building your community, Keep in mind that you need to consider yourself a brand and build your channel around this brand...theme, currency, graphics, etc. Invest in yourself.

  • Jazzing up your stream with better equipment and stream quality is a time and financial investment. Plan ahead! 

Sept Monthly Winner(s)

10/1/2017

Our first official monthly drawing for Sept happened! Again, as a reminder- the top 10 currency holders are entered into a random drawing for a prize. This month was a $5 Xbox gift card and I decided to do two cards and have two winners since we had some very generous donations in Sept.

The winners are @Cortex and @AnOrdinaryGirl

gg

OVERVIEW

Consoles


Xbox One S, 360

Switch, Wiiu, Wii, N64, NES Classic

PS4 Slim, PSVR, PSTV


Computers


Streaming PC 

Gigabyte GA-Z77X-UP5 TH, i7 3770k, GTX 670, 16 GB DDR3


Gaming PC (building now!)

AMD Ryzen 2700x, , Gigabyte AORUS X470 Gaming 7, Radeon RX580, 16GB DDR4

Gaming Laptop

i7-6700HQ, GTX970M, 16 GB DDR4


Video


Elgato Game Capture HD, High Definition Game Recorder for Mac and PC, Full HD 1080p


Logitech HD Pro Webcam C920, Widescreen Video Calling and Recording, 1080p Camera, Desktop or Laptop Webcam


Logitech C615 HD Webcam


ePhotoInc 5' x 7' PHOTO COLLAPSIBLE CHROMAKEY GREEN BLUE BACKGROUND 2 in 1 Backdrop Panel T57BG


ESDDI 20"X28" Softbox Photography Lighting Kit 800W Continuous Lighting System Photo Studio Equipment Photo Model Portraits Shooting Box 2pcs E27 Video Lighting Bulb


ESDDI Photo Studio Photography 85 Watt 5500k Day Light Fluorescent Full Spectrum Bulb E27 Base


Flashpoint Photo/Video 19" AC Powered 600W 5500K Dimmable Fluorescent Ring Light With Bag (Light Only)


Flashpoint 19" White and Yellow Color Filter Set for the 19" Fluorescent Ring Light (not LED)


Neewer 18 inches Collapsible Photography Video Light Softbox Diffuser for 75W(600W Equivalent) Ring Fluorescent Light Flash Light


Elgato Stream Deck - Live Content Creation Controller with 15 customizable LCD keys, adjustable stand, for Windows 10 and macOS 10.11 or later


Audio


Mackie PROFX8V2 8-Channel Compact Mixer with USB and Effects


Audio-Technica ATR2100-USB Cardioid Dynamic USB/XLR Microphone


Neewer NW-35 Metal Suspension Boom Scissor Arm Stand with Built-in XLR Male to Female Cable, Shock Mount and Table Mounting Clamp (Black)


Dophee Condenser Microphone Shock Mount Stand Holder Clip Black


Audio-Technica ATH-M50x Professional Studio Monitor Headphones, Black


AUKEY Ground Loop Noise Isolator for Car Stereo Systems and Home Audio Systems, 3.5mm Audio Cable Included


Hosa CMP-110 1/4 inch TS to 3.5mm TRS Mono Interconnect Cable, 10 Feet


AmazonBasics 3.5mm Male to Female Stereo Audio Cable - 6 Feet (1.83 Meters)


UGREEN 3.5mm to 2RCA Audio Auxiliary Stereo Y Splitter Cable (6ft)


Mackie CR3 CR Series 3" Creative Reference Multimedia Monitors (Pair), Black, 3"


Software